Securing the Master Making Unit of MZ/ME machines for transport
Steps
Turn on the machine and "call" the MMU by pressing the green button on the top-right hand side of the Riso (just like you would when replacing the master roll). Do not open the side cover where the master roll sits, instead turn off and unplug the machine.
Unscrew this plastic part with 6 screws and carefully slide it towards you (when standing in front of the paper exit tray of the Riso.
Unscrew the 3 screws and carefully slide the display panel (pulling very level) towards you while standing in front of the Riso. Be careful to pull it out just enough to detach it from the lower cover because it is still (and will stay) attached to the machine by a string of cables (on the left side).
Place the display panel on top of the machine (on the scanner unit as shown on the picture or on the closed scanner unit lid). Be careful not to squeeze the cables of the display panel — you can place the panel in a way that has the left side hanging in the air (as shown on the picture).
Unscrew the 3 screws of the lower plastic cover and take out the screws of their holes (otherwise the panel will remain stuck). Now carefully pull the cover towards you while standing in front of the Riso. Take a look at the notch (blue circle in the picture). When putting the cover back in place, it needs to fully slide into this notch to be in the right place.
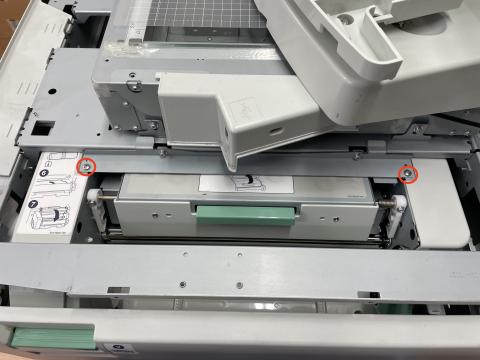
Take 2 screws and put them in place where the holes are (on the picture the left hole is shown, take a look at the next step for both holes). If the MMU and the holes don't match perfectly, carefully move the MMU by hand until they do. Do not over-tighten the screws — use just enough tension to keep the MMU from moving. The top plate (with the holes) will bend slightly downwards — this is normal and is also a good indicator of what is too much when tightening the screws.
With the 2 screws in place (see picture), put back the lower cover, next the display panel and at last the top-right cover. Make sure to slide the plastic parts on very level and evenly to keep them from blocking.
!!Now put a note on the display of the Riso and some tape over the ON/OFF switch to remind yourself of what you just did before turning on the Riso again!!
