Skew: Difference between revisions
Robertbaxter (talk | contribs) m (Robertbaxter moved page Methods for reducing skew for alignment and registration to Skew) |
Robertbaxter (talk | contribs) No edit summary |
||
| (8 intermediate revisions by the same user not shown) | |||
| Line 1: | Line 1: | ||
{{Resource}}''This is a part of the [[ | {{Resource}}{{mbox|text=''This is a part of the [[registration and alignment]] series of tutorials.''}} | ||
Unfortunately for skew, there's not really a stable mechanical adjustment to be made. One strategy is to correct skew in the machine for their key drum, or the majority of their drums, and then use compensation methods for the rest. Typically skew is a fraction of a degree, which is visible across an A3/ | '''Skew''' is the ''rotation'' of the printed image on the paper. Generally skew is undesirable (all images should be square to the paper) as when it is different from drum to drum it can make registration between color layers impossible. | ||
Unfortunately for skew, there's not really a stable mechanical adjustment to be made. One strategy is to correct skew in the machine for their key drum, or the majority of their drums, and then use compensation methods for the rest. Typically skew is a fraction of a degree, which is visible across an A3/tabloid print. | |||
==Digital methods to correct skew== | ==Digital methods to correct skew== | ||
| Line 8: | Line 10: | ||
Skew can also change over time if the machine and drums change mechanically. | Skew can also change over time if the machine and drums change mechanically. | ||
==Physical | ==Physical methods to correct skew== | ||
=== Magnets on the feed tray=== | === Magnets on the feed tray=== | ||
You can angle the paper in the feed tray (with some magnets) to compensate. The paper is only guided in the feed direction via the fairly weak guides at the front of the stack, which are only held in place with some simple friction brakes (sometimes broken in older machines). Adding magnets as side guides to the back of the stack gives the paper a lot more support and limits the range of motion of the sheets more, so less bounce in the sheets equals less up/down misregistration in the prints. Pushing one side edge of the stack more than the other as it feeds into the machine can help reduce the skew by working against the way it might be pulled. | You can angle the paper in the feed tray (with some magnets) to compensate. The paper is only guided in the feed direction via the fairly weak guides at the front of the stack, which are only held in place with some simple friction brakes (sometimes broken in older machines). Adding magnets as side guides to the back of the stack gives the paper a lot more support and limits the range of motion of the sheets more, so less bounce in the sheets equals less up/down misregistration in the prints. Pushing one side edge of the stack more than the other as it feeds into the machine can help reduce the skew by working against the way it might be pulled. | ||
In the US, these red magnets from Ace Hardware are recommended by multiple studios: [https://www.acehardware.com/departments/tools/hand-tools/magnets/2108603 Magnet Source 2 in. L X .75 in. W Red Handle Magnet 50 lb. pull 1 pc] | In the US, these red magnets from Ace Hardware are recommended by multiple studios: [https://www.acehardware.com/departments/tools/hand-tools/magnets/2108603 Magnet Source 2 in. L X .75 in. W Red Handle Magnet 50 lb. pull 1 pc]. | ||
<gallery class="center" widths="300" heights="300" style="margin-top: 1em;"> | |||
Ace Hardware Magnets on Feed Tray to reduce skew photo by Paul from Current Editions.jpg|A pair of red-handled magnets securing the back of a stack of letter-sized paper. | |||
</gallery> | |||
For machines where the feed tray is not metal at the back, [[Robert Baxter]] recommends taping a steel ruler across the back of the feed tray so you can use the block magnet method to hold the back of the paper stack that people use on risos with metal feed trays. | For machines where the feed tray is not metal at the back, [[Robert Baxter]] recommends taping a steel ruler across the back of the feed tray so you can use the block magnet method to hold the back of the paper stack that people use on risos with metal feed trays. | ||
You can also use extra magnets on the outer edges of the paper feed guides themselves to make them more stable. | You can also use extra magnets on the outer edges of the paper feed guides themselves to make them more stable. | ||
=== Working with the stencil after it is made === | === Working with the stencil after it is made === | ||
Latest revision as of 18:48, 6 November 2025
Skew is the rotation of the printed image on the paper. Generally skew is undesirable (all images should be square to the paper) as when it is different from drum to drum it can make registration between color layers impossible.
Unfortunately for skew, there's not really a stable mechanical adjustment to be made. One strategy is to correct skew in the machine for their key drum, or the majority of their drums, and then use compensation methods for the rest. Typically skew is a fraction of a degree, which is visible across an A3/tabloid print.
Digital methods to correct skew
To correct skew, some people do digital rotation ahead of time, for example with InDesign. To do this, you need to make a print and measure the skew of the print on the drum at set points in the design, to a level to at least the tenth or hundredth of a degree. At Colorama, they measure the skew for each color drum, in each machine, (and in two drum machines, in position one vs position two) and make a list that they tape to the machine. Then digital adjustment is made to the file before printing.
Skew can also change over time if the machine and drums change mechanically.
Physical methods to correct skew
Magnets on the feed tray
You can angle the paper in the feed tray (with some magnets) to compensate. The paper is only guided in the feed direction via the fairly weak guides at the front of the stack, which are only held in place with some simple friction brakes (sometimes broken in older machines). Adding magnets as side guides to the back of the stack gives the paper a lot more support and limits the range of motion of the sheets more, so less bounce in the sheets equals less up/down misregistration in the prints. Pushing one side edge of the stack more than the other as it feeds into the machine can help reduce the skew by working against the way it might be pulled.
In the US, these red magnets from Ace Hardware are recommended by multiple studios: Magnet Source 2 in. L X .75 in. W Red Handle Magnet 50 lb. pull 1 pc.
-
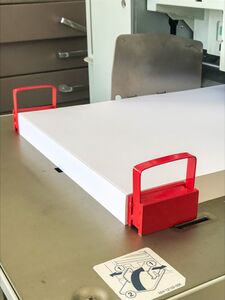
A pair of red-handled magnets securing the back of a stack of letter-sized paper.

For machines where the feed tray is not metal at the back, Robert Baxter recommends taping a steel ruler across the back of the feed tray so you can use the block magnet method to hold the back of the paper stack that people use on risos with metal feed trays.
You can also use extra magnets on the outer edges of the paper feed guides themselves to make them more stable.
Working with the stencil after it is made
Some people also make the stencil, then remove the drum and rotate it, peeling the stencil off, then re-placing the stencil on with the skew corrected.
You for longer print jobs, skew can occur as the stencil shifts on the drum screen over the course of printing. Using masking tape to tape down the stencil to the screen can keep it from shifting, but you need to remember to manually remove the stencil after you're done printing.