Ink tube transfer
| Ink tube transfer | |
|---|---|
| Difficulty | Beginner |
| Duration | 10 minutes |
| Tools | M24×3.0 nut Donor tube (with ink) Recipient tube (empty) Plunging tool (optional) Hex wrenches (optional) Pliers |
An ink tube transfer moves ink from one cartridge to another. It is one of the ways to modify new supplies to work with older machines, and can also be used to deal with the false empty tube error.
For the most part this process can be done quickly and easily with a few tools—but not done carefully it can be an inky process.
For an alternate method of modifying tubes for older machines, see: 3D printed ink tab.
Background
Riso ink is packaged in roughly 1000 mL quantities in plastic ink tubes (officially "cartridges"). All forms of cartridge have some means of being identified by the drum and riso. This was both to prevent the wrong color from being used when changing the ink cartridge, and to establish a system of proprietary inks.
There are two basic systems of tube and tube recognition:
- On

 RPRN tubes, a physical tab projects from the end of the tube, next to the nozzle, and presses a button inside the drum.
- Different tab positions press different buttons, and usually identify the type of tube and the machine it is meant for.
- This type of tube has a large nozzle (the drums that use them have a piston pump) and color tubes are usually marked "COLOR" rather than with a series name.
- On tubes for Z+Any machine released with or after the RZ line, i.e. RZ/RV/EZ/EV/SF/SE and MZ/ME/MF/MH machines. machines, the ink information is stored on a small RFID sticker on the end of the tube, above the nozzle. This is read by the drum (or a signal is fed to the risograph which reads it directly) and contains multiple bits of information about the ink, including color, type, expiration date, and a volume approximation.
- The riso compares the values on the tube with the ones stored on the drum PCB, and throws an error if they do not match.
- These tubes have a smaller nozzle (the drums that use them have a rotary pump).
- The FII line of ink is the most common set currently available.
While there are different formulations of ink, the ink itself can often be used interchangeably across machine but the cartridges cannot. However, the cartridges are all very similar, so interfacing them is not too difficult. Most often this is used to transfer ink from a new FII tube into an old empty COLOR tube, so that the ink can be used in ![]()
![]() RPRN drums.
RPRN drums.
Procedure
Be cautious when doing a tube transfer, and be prepared for an inky mess if things go wrong. The transfer should be done over a surface that can get inky or be easily cleaned. Gloves and an apron can be used as well.
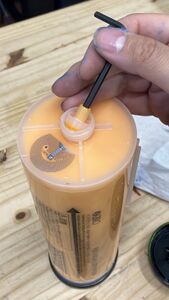
- Take the donor tube (the one with ink), stand it on end, cap side up, and remove the cap.
- If this tube has one of the small nozzles (with an inner diameter of ~4 mm), insert something of a similar size as the nozzle (such as a hex wrench), and leverage out the nozzle insert to expose the wider nozzle. (This can also be pulled out with pliers, but the insert will get deformed—so only use pliers if the small nozzle doesn't need to be reused.)
- Screw an M24×3.0 nut onto the end of the nozzle (this is an uncommonly large size, so may need to be special ordered).
- Some older Black tubes have a larger nozzle size, which does not fit the M24×3.0 nut.
- In this case, use the custom cap method described at the end of this article.
- Take the recipient tube (the empty one—which should work with whatever riso will be using the transferred ink), remove the cap, and if it has a small nozzle remove it as described above.
- Screw the recipient tube upside-down into the nut, on top of the donor tube.
-
Removing the nozzle insert from an FII tube.
-
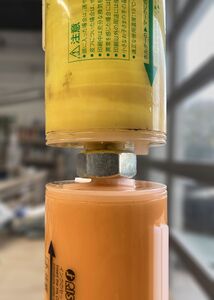


- Flip the two connected tubes over so that the donor tube is on top and the recipient tube is below.
- Insert a long object (at least the length of the tube) through the hole in the center of the cage at the back/top of the donor tube, and very slowly press down on the plastic plunger inside the tube.
- As the plunger descends, ink will push from the donor tube to the recipient, and the plunger on the recipient will descend as well.
- When the ink is fully transferred, unscrew the two tubes from the nut.
- If the smaller nozzle is going to be reused (i.e. if this is for a Z+Any machine released with or after the RZ line, i.e. RZ/RV/EZ/EV/SF/SE and MZ/ME/MF/MH machines. machine), press it back into the nozzle—it will reseat itself and click into place, with the smaller nozzle sitting just below the surface of the larger nozzle. (For these Z+Any machine released with or after the RZ line, i.e. RZ/RV/EZ/EV/SF/SE and MZ/ME/MF/MH machines. transfers, if the RFID sticker on the recipient tube doesn't match, then the drum may need to be reprogrammed or the empty chip trick may need to be used.)
- Before inserting the newly filled tube in a drum—press lightly in on the plunger from the back of the tube to get any air out of the nozzle (ink pumps can seize up when filled with air instead of ink).
History
Previously, instead of the M24×3.0 nut, a custom joiner/union was made by drilling holes through two ink caps, and then gluing them together. This method can still be used if the nut isn't available—but is much messier.[1] There are some Black ink tubes for older machines that have a totally different nozzle size from other tubes—in those cases making a custom transfer tool like this may be necessary.
References
- ↑ This article is based on How-to: Transfer Ink from one tube to another by User:IssuePress.